| 1st Generation Neons FAQ |
| neons.org |
The scope of this FAQ is only of basic issues, procedures, & troubleshooting assistance. This section is meant as a quick guide to some problems & questions common to the Neon. It cannot & is not intended to substitute for a repair manual, which has illustrations & is essential for step-by-step repair procedures. Also, this section is not a How-To list, which appears elsewhere on neons.org. Another good source of information is the Neon Technical Service Bulletins list; some common TSB numbers are included here as well.2.1 General
2.1.1 What will I need to work on my Neon?
A repair manual.You should also get a copy of the Owner's Manual for your car & read it. It will outline important, common topics relating to routine, preventative maintenance & describe how to operate the car in a manner that will prevent many problems that occur due to unfamiliarity with the car's design.
Tools: Metric-sized tools are required to work on the Neon. The tools needed will be specific to the repair, so it will be neccessary to read the repair procedure in the book & then assemble the tools needed for the repair. For starters, pliers, screwdrivers, a socket set with extensions, "wiggle" (articulated) sockets, & a set of Torx bits are needed.
An essential tool is a torque wrench. The torque wrench measures the force applied when tightening nuts & bolts. Many components have critical requirements for the amount of torque to be applied (including spark plugs). Specifications for torquing particular fasteners are given in most shop manuals for the Neon.
2.1.1 What workshop manuals are available?
The factory manual is superior, but more expensive. Three repair manuals for the Neon are currently avalailable:
- The Chrysler Corporation's Dodge & Plymouth Neon Factory Service Manual (available from Chrysler).
- Dodge & Plymouth Neon 1995 thru 1999 by Haynes Publishing (ISBN 1 56392 369 6 available at bookstores or some auto parts stores)
- Chilton's Chrysler Neon, 1995-99 by Thomson Delmar Learning (ISBN-10: 080198971X available at bookstores or some auto parts stores)
2.1.2.1 What errors are in the Haynes manual?
The Haynes manual contains a few errors, some are:
- DOHC engine, Ignition System, spark plug type, page 1-2: Champion RC9YC5 or equivalent
Incorrect, both the SOHC & DOHC use the same spark plugs: Champion RC9YC or equivalent- DOHC engine, Ignition System, spark plug gap, page 1-2: 0.050"
Incorrect, both the SOHC & DOHC have the same spark plug gap: 0.035"
2.1.3 How do I get a Service Manual?
The Neon Factory Service Manual is a two volume set (p/n 81-270-5025 for the main volume and 81-270-5025a for the supplement), and is specific to the model year. Note that ordering the first part number should get both volumes. The '95 m/y set costs approximately $65; later years run almost $100.
It, & other Chrysler literature can be ordered online at www.techauthority.daimlerchrysler.com
It can also be ordered by mail:Chrysler Corporation Tech AuthorityHaynes also publishes a Neon service manual, which is available at many parts stores and book shops. At about $20, it is substantially cheaper than the FSM. However, it contains much less detailed information.
CIMS 423-21-06
26001 Lawrence Avenue, Center Line, MI 48015
Credit Card phone: 1-800-626-1523 or 1-800-890-4038.
2.1.4 Where can I get all those funky tools listed in the Service manual?
You can purchase all the Special Tools from:Miller Special Tools, 28635
Mound Rd, Warren, MI 48092
(800) 801-5420
2.1.5 What are the bolt sizes & tightening torques for my Neon?
Neons.org is assembling & maintaining a Bolt Replacement Guide as a "sticky", one of the top posts in the 1st Gen forum.
2.2.1 Are headgaskets really a problem?
The Neon has a reputation for headgasket failure, and it has affected many Neon owners. Since the blocks are identical, both the SOHC and the DOHC are susceptible. Chrysler revised the original gasket twice to address this issue, and finally released an all-new part. The new MLS (multi-layered steel) gasket supersedes the old part under the same p/n. The new gasket went into production SOHCs in September of 1998 (part of the '99 m/y), with the DOHC following shortly after that, probably before November of '98. TSB 09-05-98, which describes the revised part, was issued on November 06, 1998. This means that the new piece was available at parts counters around that time.Nearly all failures occur in the driver's side rear of the engine block, where an oil passage crosses between head and block within 1/4" of the outside edge. The most common symptom is an oil leak at the block joint in the vicinity of the brake reservoir. Other, less common symptoms of headgasket failure include: water in the oil (indicated by foam on the dipstick or drain pan), oil in the coolant overflow reservoir, and burning of coolant (continual steam or light grey soot in exhaust pipe). However, most Neon headgasket failures do not cause mixing of oil and coolant.
Two items should be kept in mind on this subject. First, with more than a million Neons on the road, even a large number of failures is a small percentage of the unaffected cars. Second, this problem is common among most cars with aluminum heads, not just Neons. This kind of head design saves weight, and is typical on modern cars. However, aluminum heads are sensitive to overheating and may crack or warp, which leads to gasket failure.
Headgasket failure is enough of a problem, however, that Chrysler has made special provisions for headgasket repairs beyond the normal warranty period. While dealers probably won't volunteer to fix a car that has exceeded its warranty, many Neon owners have found that a call to the Customer One phone number may help. Depending on the age of the car, Chrysler may pay a portion of the replacement cost; in many instances, repairs have been made just as if warranty coverage existed. Also, owners who have paid out-of-pocket to have the headgasket replaced may be reimbursed under this extension. In many cases, full coverage of headgasket failure has been extended to five years or 100,000 miles.
2.2.2 What oil should I use? What about additives?
The factory recommended oil for both engines is 5w-30, year round. See the Owner's Manual for oil change intervals.Many people prefer synthetic oils such as Mobil-1, Castrol SynTec, and others. Synthetic oils hold up better under high temperatures, and some people feel they offer longer intervals between changes. Synthetic oils are more expensive than regular oils, but much less expensive than engine repairs. Most people who use synthetics find that they keep internal parts cleaner, and help extend engine life.
Some notes for racers and autocrossers:
"The SOHC can be raced using the lighter weight oils, too. I prefer synthetic... Racers of DOHC cars should run heavier 15w or 20w-50 synthetic oil, change it often, and install the restrictor (p/n 4856291) in the make-up air tube that comes out of the driver's side of the valve cover."Additives have some devoted followers, but most people agree that they are ineffective at best, and harmful at worst. Products like Slick-50 and others often contain Teflon bits in suspension. This can clog small oil passages, and in general is a source of internal gunk. DuPont, who makes Teflon, specifically recommends AGAINST using it in engines. Modern motor oils, particularly synthetics, are carefully designed formulas. Adding other products can interfere with the performance of the original oil.- Erich Heuschele, Grassroots Motorsports
2.2.3 What oil filter should I use?
The Neon originally shipped with a large filter (Mopar p/n?). This was changed to a smaller filter (Mopar p/n?) by a TSB applying to all Neons. Due to the filter's placement, the large filter is vulnerable to damage, since it hangs down below the frame crossmember. Some people prefer to use the larger filter because of its additional element capacity, but Chrysler thought it was important enough to issue a TSB about.Mopar's filters include an anti-drainback valve to stop oil from collecting in the filter when the engine is off. Dealer pricing varies from reasonable to ridiculous, however, so shop around. Some other manufacturers and part numbers are listed below:
Smaller filter: Fram PH-3614, Mobil M1-102
Larger filter: Fram PH-16,
2.2.4 What spark plugs should I use? What is the correct gap?
Neon OEM Spark Plug Specifications Spark plug: Champion RC9YC Spark plug gap: 0.035" Torque plugs to: 20 ft/lbs Many opinions exist on which is the best plug; the most important factor seems to be the age of the plug rather than the manufacturer. Changing plugs every 10,000 to 20,000 miles will keep them fresh. Most people agree that Splitfires or other novelty plugs do not provide any additional power, and are often more expensive.
The correct spark plug gap is 0.035" for both SOHC & DOHC engines. Note that the Haynes manual has an incorrect gap specified for the DOHC.
Use a torque wrench. Many folks have stripped the threads in the Neon's aluminum head by overtightening the plugs, & neccessitating repairs to the head.
Equivalent plugs from additional manufacturers:
It's a good idea to apply anti-sieze to the spark plug threads before installing the plugs.
Champion: RC9YC (OEM plug)
NGK: FR-5
Bosch: 7527
2.2.5 What is the significance of the timing belt? Are the engines an 'interference' design?
Yes. Both the SOHC and DOHC engines are an interference design, meaning that the valves if open will conflict with the piston in its highest position. This only happens if the timing belt fails, since the valves are normally closed when the piston is at top dead center and the cylinder is firing.The Neon has a 100,000 mile timing belt; however, it should be inspected periodically. Failure of the timing belt will lead to collisions between pistons and valves, causing extensive (and expensive) engine damage. Diagnostic code 11 indicates possible timing belt problems, and should be taken seriously. Have the car towed to your mechanic if encountering this problem.
The timing belt can be easily inspected by removing the plastic cover over the passenger side of the engine (driver's side for you UK and down under folks). Look for any frayed or worn areas. Turning the engine over with the coil wire removed will allow you to inspect the whole belt one section at a time.
The timing belt must be replaced every 100,000 miles. It has been found that it is a good idea & easiest at that time to also replace the tensioner & water pump both of which are prone to a failure mode which may have catastrophic results as a result of affecting the timing belt.
2.2.6 What is OBD II? What are 'error codes'?
OBD stands for On Board Diagnostics, and is a federally mandated specification for new cars, largely aimed at reducing emissions. The car logs certain problems that occur, and activates the 'Check Engine' light (CEL) to alert the driver. A mechanic with the proper DRB Scan Tool can the review this log in some detail to assist in repairing the problem. The most direct benefit is that owners can access some of this information themselves. Certain codes will set off the CEL while driving; some do not. It is a good idea to check for hidden codes occaisionally.Neons.org maintains a list of error codes & possible problem solutions as a "sticky", one of the topmost posts in the 1st Gen forum.
To read any OBD codes, perform the following sequence.
1) Cycle the ignition key ON-OFF-ON-OFF-ON within 5 seconds.
2) Count the number of times the 'Check Engine' lamp on the instrument panel flashes on and off. The number of flashes represents the code. There is a slight pause between the flashes representing the first and second digits of the code. Longer pauses separate individual codes. For example, flash-flash-flash [pause] flash-flash represents the code 32.To cycle the ignition key ON means to turn it only as far as it takes to get the dash lights to respond. It does not mean to crank the engine.
Neon On-Board Diagnostics Code Description of Trouble Code 11 Timing belt skipped 1 tooth or more from initial learned value;
Intermittent loss of either camshaft or crankshaft position sensor;
No crank reference signal detected during engine cranking12 Direct battery input to PCM was disconnected within the last 50 key-on cycles 13 No change in manifold absolute pressure (MAP) from start to run 14 Manifold absolute pressure (MAP) sensor voltage out of range 15 No vehicle speed sensor signal 17 Closed loop temp not reached or engine cold too long 21 02 sensor problem (oxygen sensor), upstream or downstream 22 Engine coolant temp sensor out of range 23 Intake air temp sensor out of range 24 Throttle position sensor (TPS) out of range, or disagrees with MAP 25 Idle air control motor circuits problem, target idle not reached (+/- 200), vacuum leak found 27 Injector control circuit problem 31 Evaporator purge flow monitor failure or evaporator solenoid circuit problem 32 Exhaust gas recirculating (EGR) system failure or solenoid circuit problem 33 A/C clutch relay circuit problem 34 Speed control solenoid circuits problem 35 Radiator fan control relay circuit problem 37 Torque converter clutch solenoid circuit or park/neutral switch failure 41 Generator field not switching properly 42 Fuel pump relay control circuit problem
Auto shutdown (ASD) relay control circuit problem
No ASD relay output voltage at PCM
Fuel level sending unit - volts out of range
Fuel level sending unit - no change over miles43 Multiple/ single cylinder misfire 44 Battery temp sensor volts out of range 46 Charging system voltage too high 47 Charging system voltage too low 51 Fuel system lean 52 Fuel system rich 53 Internal controller failure 54 No cam signal at PCM 55 End of error messages (If you get this only, no errors were found) 62 PCM failure - SRI mile not stored 63 PCM failure - EEPROM write denied 64 Catalytic converter efficiency failure 65 Power steering switch failure
2.2.7 My engine's leaking oil, and I'm scared. Help!
Don't panic yet. Both the SOHC & DOHC engines may leak oil at the cam position sensor (CMP), which is located below the intake piping that leads from the airbox containing the air filter to the throttle body. There is an O-ring seal at this sensor which can fail, but is relatively easy to replace. The resulting oil leak can appear to be either the head gasket or the main seal between engine and transmission. Check this spot first.Another common leak is the oil pressure sensor, located on the back of the block under the exhaust manifold. This is also sometimes mistaken for head gasket failure. Remove the sensor unit using a special 1 1/16" oil pressure sender socket (available at auto parts stores), as regular sockets will damage the unit. Apply oil-resistant (yellow) teflon pipe tape to the threads of the sensor, and reinstall it.
2.2.8 My Neon makes a gurgling or boiling noise when I turn it off. Could this be a problem?
"I shut off the (well warmed) Neon, it "boiled", then I went to squeeze the upper radiator hose. VOILA! It had NO pressure in it, and when I squeezed it the overflow tank "gurgled".That meant that the radiator cap is not sealing in the pressure, and allowing the system to vent all the time.
[The dealer] flushed the coolant but didn't replace the original cap which had seated itself onto the rim of the cap mount. When they put the cap back on, there was no way it was going to seal again, so the cooling system never pressurized and eventually boiled a significant amount of coolant out of the system. That meant that there was void in the cooling system that deprived the head and upper combustion chamber of much needed coolant for extended periods of time and numerous heat cycles. This (I suspect) caused the head to warp and the gasket to fail causing my oil leak.
If anyone out there has a "boiling" or "gurgling" noise when they shut off their Neon, it is likely that your radiator cap (not exactly on the radiator anymore) is bad, and you could be boiling away precious coolant. Replace the $6 part now and save yourself $$$ later. The cap can be bought at NAPA (p/n 703-1447); it's a 16 lb cap made by Balkamp.
It is not likely that I will be able to pin this on the dealer even though it was their negligence that ultimately caused the failure."
- Stephan A. Zweidler
2.2.9 My Neon makes a whistling or squealing noise when I turn it off. Could this be a problem?
The PCM (Powertrain Control Module) may emit a high-pitched "whistle" sound after the engine is shut off. The sound may last up to eight minutes. The noise can vary in pitch and intensity from one PCM to the next and with changes in temperature and battery system voltage. This noise is due to the PCM being "powered up" after ignition-off to enable a diagnostic routine for the O2 heater operation. This diagnostic routine will only occur when certain parameters are met, which include engine operating temperature and how long the vehicle has been driven. This noise may also be heard with the ignition on and engine running, but is usually muffled by the normal engine operation sounds.Replacing the PCM may seem to eliminate the noise for a period of time, but this is only due to the system not meeting the qualifying parameters to run the ignition-off diagnostic routine. THIS IS AN OPERATIONAL CHARACTERISTIC OF THE PCM AND NO REPAIRS SHOULD BE ATTEMPTED.
2.2.10 What is the deal with motor mount failures?
The front motor mount (FMM) on the Neon has a somewhat undeserved reputation for failure. The motor mount isolator (p/n ATX - 4668182, MTX - 4668183) is circular in shape with two vee-shaped slots (see image here) in it. A web of rubber joins the point of the vee with the bottom lip of the circle. This web may tear under normal use, giving the appearance that the mount has failed. Note that this web was placed to facilitate the manufacturing process only, and is not a structural part of the mount design. Tearing of the bottom web does NOT mean that the mount needs to be replaced. Unless one of the upper flanges of the vee is torn, the mount will function normally.The OEM motor mount is somewhat soft, to control vibration. This allows the engine to move a noticeable amount, which aggravates the appearance of mount failure. The soft mount can allow wheel hop during hard launches. Performance drivers will benefit from installing inserts (Rex units, homemade inserts, or poured-urethane filling). See the question on stiff motor mounts for more information. [Motor mount image courtesy of Jeff Ball.]
2.2.11 My Neon made a horrible noise when I hit some deep puddles, and I thought it was going to explode.
The mysterious 'puddle growl' was finally diagnosed a year or two ago. This is happens when substantial water splashes onto the exhaust piping, causing it to cool suddenly and thus distort. If it is not tightly secured in all of the rubber hangers, the pipe may rotate enough to vibrate against the sheet metal heat guards under the car. The resulting noise should disappear when the pipe returns to a consistent temperature and resumes its original shape.
2.2.12 I changed my spark plugs, and the well was full of oil. Does this mean my head gasket is shot?
No (relax). Assuming the actual electrode end of the plug is dry (discounting fresh drips from removal), oil in the plug wells does not mean head gasket trouble. Each plug well has an O-ring seal ot the bottom where the plug goes through the valve cover. Failure of this seal will cause oil from the valve train to seep into the plug wells. The seals are not terribly difficult to replace since removing the valve cover is not major surgery; however, care should be taken any time the interior of the engine is exposed.
2.2.13 Why is my gas mileage so bad?
Usually because your Neon is so fun to drive. The Neon's fuel economy varies widely depending on conditions (of course) but also upon your driving style. Heavy use of the accelerator, or extending cruising above 65 mph, will both put a serious dent in your mileage. (Un)fortunately, the Neon thrives on being driven that way.Typical mileage for the ATX car is 22-28 mpg, with slightly higher numbers possible on extended trips if you're careful. The MTX version with its taller top gear tends to get 26-34 mpg, with the lower final drive transmissions toward the bottom of that range. Numbers over 40 mpg have been posted on long trips.
An occasional issue is the development of a crack in the exhaust manifold. When this happens, additional oxygen from the atmosphere can be drawn into the exhaust & measured by the downstream O2 sensor. The PCM interprets this additional air in the exhaust as the engine running too lean, & so directs additional fuel to be injected into the engine. If the exhaust manifold is inspected & found to be cracked, replacement is the best solution as repairs of cast iron are often unsuccessful.
2.2.14 My Check Engine Light is showing codes 12 and 21. What's wrong?
Codes 12 and 21 (from the OBD II diagnostic check) are a common occurrence. These codes seem to appear when the electrical system voltage drops sharply for a very short period of time, such as when lifting suddenly after wide open throttle, or if the engine stumbles momentarily. If the car is running normally, there is likely no problem and the codes should disappear by themselves after a dozen starts or so. If there is a problem, the PCM will keep the CEL lit.
2.2.15 My Check Engine Light is showing code 43. What's wrong?
Code 43 (from the OBD II diagnostic check) indicates a misfiring cylinder. It may be set even when no symptoms are noticeable to the driver. In this case, it usually means a loose plug or plug wire connection is causing weakened spark on that cylinder. Retorque the spark plugs and make sure all plug and coil wire connections are secure and dry.
2.2.16 My Oil light came on. What do I do?
First, stop the car & do not operate the car until the cause is found, or additional, expensive damage can result. Have the car towed if neccessary to a place where it can be checked; do not drive it.
The oil light normally will come on for a few seconds at startup to show that it is working. If it does not, replace the bulb. If the light stays on at idle, there is a fault with either the engine oil pressure (serious) or the oil pressure warning light system (not as serious). Check the oil pressure & the oil pressure sending unit, & then if those are not at fault, suspect the gauge cluster problem.
The oil light is activated by low oil pressure. It does not mean that the car is low on oil, although being very low on oil can be a cause of low oil pressure.
Check the dipstick & make sure the proper amount of oil is in the car. If it is very low, check to see if there is a major leak somewhere, & fix the leak first. Add oil to the proper level shown on the dipstick, start the car again, & check to see if the light goes out.
If the light stays on, check the engine oil pressure. This can be done by a mechanic, or it can be done by buying an inexpensive mechanical oil pressure gauge, removing the oil sending unit (at the back of the engine, under the exhaust manifold), attaching the new gauge in its place, checking the oil, & starting the car, & reading the oil pressure from the new gauge.
The oil pressure should be at least 4 psi at idle. It should also be between 25 & 80 psi at 3000 rpm when the engine is warm.
If the oil pressure is within those limits, replace the sending unit with a new one. If the oil pressure light still does not function correctly, try the gauge cluster fix, & check the wiring to the sending unit.
When removing or installing the oil pressure sending unit, be sure to use the special, inexpensive oil pressure sending unit tool available at auto stores, or the sending unit will crack & leak.
If the oil pressure is below the limits, then the fault is the engine oil pressure, & not the fault of the warning system. The engine then will most likely need to be rebuilt or replaced.
Failure of the sending unit is not uncommon, & is an inexpensive & fairly easy repair. Do not damage the new sending unit by not using the special socket, or you will have to replace it again.
2.3.1 What kind of fluid should I use in the automatic transmission?
You *must* use type 7176 transmission fluid in all Chrysler-built automatic transmissions since the mid-70's. Dexron II and III are much more slippery than type 7176/ATF+3 and will cause shuddering during shifts. The latest version of the Mopar ATF is Mopar ATF+3 type 7176. It is more heat resistant than the prior ATF+2 formula.Yes, there are aftermarket equivalents for the Mopar ATF+ auto trans fluid. I got a memo a few months ago advising that the following fluids are among those known to meet Chrysler's MS7176D specs:
Citgo ATF type 7176
Esso (Canada) ATF+2 Type 7176
Kendall Type 7176 ATF
Quaker State 7176 ATF
Pennzoil 7176ATF
Texaco Texamatic Fluid CS 7176M
Valvoline ATF for Chrysler Vehicles"I have recently become aware of two synthetic fluids that meet 7176 specs:
Amsoil ATF (don't know if it's Chrysler-specific or not), which has been tested against the ATF+2 type 7176 specs and probably meets ATF+3 specs also.
Red line ATF for Chrysler vehicles, which has been tested against the ATF+3 type 7176 specs. Note that Red Line offers a specific ATF for Chrysler vehicles -- their Dexron/Mercon is *not* appropriate!
There certainly could be others out there that meet the 7176 specs that I am not aware of..."
- Greg Smith
2.3.2 What kind of fluid should I use in the manual transmission?
"Just make sure you use the A578-specific semi-synthetic fluid (p/n 4773167) that's available at the dealer. It is specifically matched to the synchronizer material for good shifting, and has special friction modifiers to last a lifetime... You're on your own if you decide to use something else."- Erich Heuschele, from Grassroots Motorsports
2.3.3 What is the duty cycle of transmission fluid for each unit?
In normal use, the automatic transmission fluid should never need to be replaced unless the transmission is serviced. Fluid level should be checked periodically and topped off with the correct type. Under severe conditions (taxi use - that severe) the transmission fluid and filter should be replaced every 15,000 miles. For most of us it seems that something in between, say every 50,000 miles, would be prudent.The manual transmission fluid duty cycle is the life of the car. Even under racing conditions, there is no evidence that it needs to be replaced more frequently.
Either fluid should be replaced if water or other contaminants get into the unit.
2.3.4 Why is my manual transmission getting hard to shift?
The manual shift linkage contains several rubber bushings to isolate noise and vibration. These may deteriorate over time, which means that precise control is lost and the shifter becomes loose or balky. If shifts are no longer smooth, or you have difficulty finding a certain gear, check there first. Most dealers will not sell just the bushings, and the linkage assembly costs over $100. Numerous owners have made their own bushing replacements using rubber stoppers or faucet washers. Replacement poly bushings such as Booger Bushings from Jeff Ball are excellent replacements; they last longer & yield a more positive feel when shifting.
2.3.5 My clutch is making popping noises, or feels funny.
The Neon has a self-adjusting clutch cable, which contains a small ratchet that takes up slack as the clutch wears. An occasional "pop" will be heard as this happens from time to time. If the popping occurs frequently, however, it could be one of two things. First, check the path of the cable from firewall to transmission, making sure that curves are gentle and removing any kinks.Second, and particularly if the clutch pedal feels different, inspect the cable end where it terminates inside the transmission. On top of the transaxle, where the cable enters, is a small black plastic access hatch. This panel snaps out to reveal the cable end, which is a washer/brass ball that sits in the crook of the actuator fork. Examine the cable for frayed or broken fibers; replace it if any are found. If the cable breaks while driving, you will lose clutch operation. Also, the broken end or washer can fall into the bell housing and may cause damage to the flywheel or other components.
2.3.6 My Neon yelps or chirps when I shift hard, or when I go from 'R' to 'D'.
This squeaking noise is caused by the infamous exhaust donut, which is a metal seal between the exhaust manifold and the pipe leading to the catalytic convertor. As the engine moves in response to shifting (it is more common in the ATX due to more engine motion), the two pieces squeek against each other. The problem can be fixed by replacing the donut and careful reshaping of the pipe flange. Installing a stiffened front motor mount, which limits driveline movement, will also help but may not cure the problem.
2.4.1 My steering wheel shakes at 73 mph (or some particular speed) and it's driving me mad!
This issue is also addressed in some detail in the How-To section of this site. It is caused by compliance in the lower control arm bushings ( a revised part with stiffer material is rumored to be available). However, here is additional information which may help cure the problem without replacing the bushings:The Neon is *very* sensitive to wheel balance. Have your wheels rebalanced to the nearest 1/8 ouce instead of 1/4 ounce, and make sure the machine has been calibrated recently.
Make sure that your tire pressures are even between the two front tires.
If you have aftermarket wheels, remove the sheet metal retaining washers that are located over one wheel stud on each hub. These are used for assembly purposes only and are not required. Unlike the factory alloys, some aftermarket wheels do not have a small depression in the mating surfaces of the wheel, which provides clearance for this retainer. If so, the wheels can be off axis with the spindle, causing fluctuating toe in/out with each revolution. [This info courtesy of Aaron Mihe and the Australian Neon FAQ.]
If you have aftermarket wheels, get hubcentric rings to ensure that the wheel is truly centered on the spindle. Many aftermarket wheels have wider tolerance on both the stud holes and the center bore to allow fitting on multiple vehicles. If the wheel is not perfectly centered it will shake as each revolution is slightly eccentric. [This info courtesy of Jason Artley among others.]
2.4.2 What are Camber, Caster, and Toe?
Camber, caster, and toe are terms used to describe various alignment settings:Camber is the angle of the vertical axis of the wheel, measured perpendicular to the centerline of the vehicle. Camber is adjustable on ACRs and can be modified for adjustability on other Neons. Negative camber indicates that the tops of the wheels are tipped in toward the centerline of the car; positive camber means that the tops are tipped out. See the discussion on camber adjustments below for more information on this subject.
Caster is the angle of the vertical axis of the wheel, measured fore-and-aft, parallel to the centerline of the vehicle. This influences steering effort and tendency of the steering to self-center, and is not normally adjustable on the Neon.
Toe is the angle of the horizontal axis of the wheel, measured relative to the centerline of the vehicle. Toe is adjustable on all Neons. Toe-in (positive) means that the wheels are pointed slightly toward each other as the car rolls forward; toe-out (negative) means that they are pointed away from the centerline. See the discussion on alignment settings below for more information on this subject.
2.4.4 How can I adjust camber on my ACR?
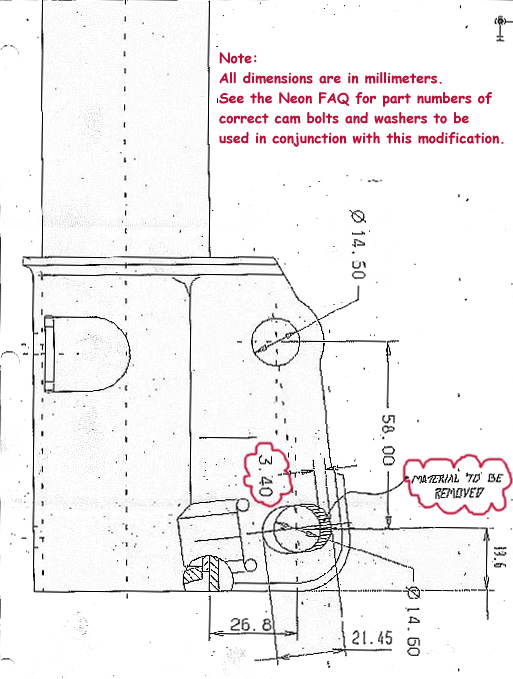
Camber is easily adjustable on '95-early, '98 m/y ACRs, and other models can be modified to allow adjustable camber. The struts on ACRs listed above have slotted mounting holes, and eccentric or "cam" bolts. With the bolts loose, the struts are adjusted in or out to set desired camber. The bolts are rotated so that the eccentric lobe holds the strut in position, and then torqued to 150 ft/lbs. There should be a tick mark on the bolt - this indicates maximum negative adjustment when rotated toward the centerline of the car. Additional camber can be gained by loosening the upper strut bolts and pushing the top inboard. The SCCA-mandated maximum camber is -2.4 degrees.Most '98 and all '99 ACRs do not have the slotted holes. Adjustment is possible to these cars (and SCCA-legal) by slotting the holes with a grinder, providing the dimensions of the original slots are not exceeded. If the holes are slotted, the round bolts should be replaced with the ACR-specific cam bolt package (p/n below). See a detail from the diagram previously published in Mopar Performance News.
2.4.4 How can I adjust camber on my Neon if it's not an ACR?
Other Neons can be modified to allow camber adjustment in several ways. The struts can be slotted as above; however, this is not SCCA-legal (in Stock classes) for non-ACR Neons. Another method, which is permitted for all Neons, is the use of the Mopar Camber Adjusting Bolt Package (front bolt p/n 4762135, about $20 for two). These are also known as "crash bolts" because they are used to bring damaged cars back into alignment spec. Crash bolts are round and slightly smaller in diameter than the originals, which allows the adjustment. One bolt in each strut will allow approximately -1 degree of camber. To get near the SCCA-mandated maximum of -2.4 degrees, you will need two bolts (top and bottom) in each strut. Additional camber can be gained by loosening the upper strut bolts and pushing the top inboard.The crash bolts, being smaller than either cam bolts or the regular knurled bolts, should only be torqued to 140 ft/lbs. Torquing them any higher will stretch the bolts. Consequently, they are unable to generate the clamp load of the originals, and may slip under autocross conditions or with race tires. They should be acceptable for street use, however. I drive approximately 18,000 vigorous street miles a year, and have not experienced any slip in camber using the crash bolts.
There is an improvised fix to prevent crash bolt slippage that seems to work even for autocross: simply paint the lower strut clevice before installing the crash bolts, then tighten them down while the paint is still wet. Once dry, the paint adds enough friction to prevent slipping. Using contrasting colors will also highlight any slip that does occur. (This fix developed by Bud Collins and Phil Osbourne.)
Some recommend against negative camber at the rear. However, alignment settings are very much a matter of personal preference. Different rear crash bolts (p/n 4773957, about $16 for two) are available; two bolts are required per wheel. Note that putting the nut forward on the top bolt makes access easier for disc brake cars, since the caliper is not in the way. (Rear crash bolt information and tips courtesy of Jeff Blankenship.)
2.4.5 What are suggested alignment settings? Will they hurt my tires?
Many people have differing opinions based on their driving style, what they do (street, autocross, track), and other factors.Here are some suggested settings with which to begin; these can be adjusted as you become more in tune with the car.
Spirited Street Camber Toe (total) Front -.5 to -1.5 deg 1/16" in (+.25 deg) Rear zero zero Competition Camber Toe (total) Front -2 to -2.5 deg 1/16" in (+.25 deg) Rear zero to -.5 deg zero "I personally run the [above] "competition" setup on both my daily drivers, year round, with no noticeable wear problems. Contrary to popular belief, excessive toe is what causes uneven tread wear, not camber. Negative camber will in fact promote good tire life by distributing the load evenly across the contact patch when cornering."Duke Wilford
In support of the listed specs, here are the words of a very successful Neon racer. This is paraphrased both from an article in Grassroots Motorsports, and posts to the Neon message boards:
"Here we go again! When I talk camber values, they are absolute, not relative to the front. Negative rear camber will increase traction at the rear. This is why it will increase understeer. This is why we club racers run 8-10 psi MORE air pressure in the rear than the front... to decrease traction at the rear and have good balance. I am resending my toe essay from a long time ago for the handling neophytes on the list. BTW no one has given a good reason to run toe out on the front yet.To evaluate toe on the front, what happens when you toe out the rear? The car oversteers. This is because the outside, more heavily loaded tire (the tire with the most influence on cornering) is pointing towards the outside of the corner. This steers the rear outward and brings the back end out relative to the front. Use that fact at the front, and you see that toe out (more than Ackerman) steers the front towards the outside of the corner. This equals understeer which I don't think you want to do. Some people use toe out, whether they think it or not, to stabilize the car (understeer). In autocrossing, the car is usually never completely steady state, and the understeer at the front makes it more forgiving. If people run toe out at the rear, this destabilizes the car. Then they dial in front toe out to compensate, whether they think it or not, for the instability. I would not recommend running any toe out at the rear of the Neon either. It has a fair amount of dynamic toe out due to bearing and bushing compliance. Static toe out ends up giving you way too much dynamically.
Another reason for not running toe out on the front of a Neon is toe compliance from acceleration. The Neon has a negative scrub radius in the front geometry. This means that the center of the contact patch is inboard of the center of steering rotation. Altering the offset of the wheels from 40mm, by the way, screws this all up. Under acceleration, the front wheels of a Neon toe out. Running static toe to my settings then gives you 0 toe dynamically under full throttle at peak torque in 3rd gear, minimizing scrub and optimizing speed on the straights. Another reason for running toe in is that it is not uncommon for the camber to slip in the positive direction at the clevice bracket due to cornering loads (make sure you torque the clevice bolts to 150 ft-lbs). When the camber setting goes positive, your toe goes out. Take the wheel off, look at the suspension, and you'll see. If this happens at an event when you can't reset the alignment, you end up with more toe out than you set. So if you start toed out, you get tons of toe out. If you start toed in, you go through zero to some toe out as it slips. Anything more than 1/8" toe out per side significantly slows the car down on the straights. We've tested it.
Everyone seems to run toe out because other people do who beat them. Do you have a good reason to run toe out in front? I'd like to hear it.Whew! long post. Hope this helps."
- Erich Heuschele
2.4.6 Are any other alignment adjustments possible?
"It is possible to shift the crossmember around and somewhat alter cross camber and caster. It is, however, net build like the camber on non-ACRs. Net build does not necessarily mean the setting isn't adjustable if you get creative. It just means there isn't a screw or cam you can turn to change it easily. Caster typically runs on the low end of the spec on Neons. There is always some variation in the location of the strut towers when the body is built up. Also, if you get more negative camber out of one side than the other, the crossmember can be shifted to balance it out."- Erich Heuschele
2.4.7 I'd like more information about toe-in versus toe-out.
In addition to the static toe setting, the toe changes dynamically as the suspension works under the car. Several factors are at work, and the effects combine to substantially change toe from the static settings.Bump Steer: this is the change in toe caused by loading or unloading the suspension. Neons toe in slightly under compression, and toe out slightly under extension. This is why a small amount of toe in is recommended above, so that the toe is near zero as the car is accelerating and weight is transferred to the rear. Additionally, a small amount of toe in makes turn-in crisper as the outside front wheel is most heavily loaded during cornering, and the bump steer of compression helps this effect as well.
Ackerman Toe: this design compensates for the tighter-radius path followed through a turn by the inside tire. The steering geometry is engineered so that toe out increases as steering lock increases. As the steering wheel is cranked, increasing toe out causes the inside tire to turn at a sharper angle, while reducing the steering angle of the outside tire.
Many autocrossers suggest toe *out*, but so far no one has met Erich's challenge in offering a scientific reason why. Toe out runs contrary to the theoretical dynamics of the Neon's suspension.
2.4.8 My Koni struts have oil on them. Are they leaking?
The Koni struts on '97 m/y and newer ACRs may appear to leak, with small amounts of oil collecting on the strut barrel. Below is the text of a flyer included with the Koni struts:"During lift inspection/servicing/tyre rotation, etc., a thin film of oil and dust collection may be noticed on the outside damper tube. This is a normal condition which occurs during the damper internal seal 'break-in' period and does not affect the performance of the damper and does not indicate the need for damper replacement. Damper replacement should only occur if the damper oil leakage is sufficient to cover the entire damper tube and has 'dripped' onto the lower control arm or onto the pavement during overnight parking."Note that some owners have experienced leaking struts. A substantial amount of oil could indicate a problem, and should be checked. Damping ability will be reduced if the strut has lost oil; testing the strut next to a known good sample can verify correct operation.
2.5.1 What kind of brake fluid should I use?
"All DOT 3 and DOT 4 brake fluid is hydroscopic, meaning it absorbs water even from the air. When brake fluid absorbs water, its boiling point drops which is very bad when the brakes are working hard. It makes it easier to boil the fluid. The main difference between DOT 3 and DOT 4 from what I can tell is the wet and dry boiling points. Wet is when it is saturated with all the water it can absorb, and dry is when no water is in the fluid. DOT 3 has a higher dry boiling point than DOT 4, but a lower wet boiling point. I run DOT 3 and bleed often, to keep that boiling point as high as it can be. If you were going to leave your brake fluid in for a significant period of time (like most people) DOT 4 would have a higher boiling point. Fortunately the Neon has phenolic caliper pistons which insulate the fluid from the brake temperature much better than steel pistons. I've never boiled the brake fluid in my race cars."- Erich Heuschele
2.6.1 My dashboard gauges are reading erratically or not all. What do I do?
The usual problem is that the solder joints on the back of the gauge cluster have failed. The solution in that case is to use a soldering iron to heat & re-flow the affected joints. Neons.org maintains a how-to post with pictures for this procedure in the "Archived Posts" section at forums.neons.org .
2.6.2 My brake lights came on & won't go off. What's wrong?
This refers to the brake lights on the back of the car, not the brake light near the gauges.This is usually a problem with the brake light switch under the brake pedal. The switch is a plunger: when the plunger is up, the brake lights are off; if the plunger is pushed in by the brake pedal, the brake lights come on.
Examine the switch. Sometimes the it will just break, sometimes the plunger will fall out of the switch. Usually, it is out of adjustment.
Don't bend the metal or shim the plunger. Give the whole thing a twist counterclockwise to undo the clip. Once you have it off, pull the black plunger until it is about 3/4" out. (Pull hard, it will make a ratchet sound as you pull out.) Put the switch back on by a clockwise twist in the square hole on the bracket (the brake pedal should be down when you put the switch back).
The brake pedal will push the plunger a little, but not all the way. It is self-adjusting and should work normally if this was the problem.
2.7.1 We all know you should use genuine Mopar body parts. Here's why.
"This isn't intended as a sales pitch, but there is a big difference between aftermarket sheetmetal and the OEM stuff. The aftermarket stuff is stamped with dies made of less-durable and less-accurate material that we only use to make prototype parts. The aftermarket makers have to go this route to contain costs; these dies cost less than half as much to make as the ones we use in production. Aftermarket sheetmetal typically doesn't fit as well as OEM, and can be difficult to install. This typically shows up as body gaps that are inconsistent; if the panel is not formed to the right shape, no amount of adjusting adjacent panels on the car will create the (relatively) even gaps that your car had when it was built.The stamping dies used to stamp body parts at the Neon plant (we saw this on the Neon 97 tour!) cost between 1-4 Million dollars *each* to develop and make. When you take into account that (on average) it takes 2 or 3 different dies to stamp out a body panel, you can see that an aftermarket maker just couldn't use dies like ours and still turn a profit.
Do the aftermarkets use galvannealed steel like the original parts? I doubt it. Galvanized (not galvannealed) sheet metal is harder to paint to a proper appearance. The Mopar OEM replacement sheet metal is coated with electrically-deposited primer (E-coat) just like your Neon's body was at the assembly plant. The use of E-coat produces rust protection equal to the original stuff, and dramatically reduces sanding and prep time for the body shop fixing your car. The Mopar sheet metal also has a rust warranty that exceeds the corrosion warranty on your car. Do aftermarket panels have this?
Differences like these are the reason why many states have laws requiring insurance companies to use OEM sheetmetal if the customer requests it.
BTW -- For those who don't understand what I mean by "stamping", think of the stamping process as being similar to using a cookie cutter on cookie dough. The cookies are shaped to 2 dimensions (width and length), but body panels are shaped to 3 dimensions (width, length and depth). Unlike sheetmetal stamping, it shouldn't take hundreds of tons of force to cut out cookies!"
- Greg Smith
2.7.2 My spare tire well or my rear set foot well is wet!
Chances are this water is coming in around the taillights. Clear replacement taillights are notorious for leaking due to cheap gaskets; however, even the OEM units leak. Get a fresh set of gaskets (about $15) from the Dodge/Plymouth dealer. When installing them, make sure the rim of the body opening is clean and smooth. Try also setting them in a small bead of RTV silicone sealant.
2.7.3 My door window rattles, and/or is hard to roll up!
The window track has probably broken; it is a part prone to failure. Repair is by replacement of the broken track. Repairs with JB weld have been reported to be short-lived. When ordering the window track, be aware that there are different ones for the left, right, coupe, & sedan doors. Also, the belt stabilizer may have deteriorated. In that case, it usually also leaves scratches on the window. Repair is again by replacement. After replacing the tracks or belt stabilizer, it is important to adjust the window to prevent wind noise & later damage.
2.7.3 What can I do about the wind noise around my door window?
The windows need to be adjusted. If adjustment does not solve the problem, or if it returns shortly after adjustment, the window track may need to be replaced, & possibly the belt stabilizer as well. Chrysler issued a TSB covering adjustment of the front door window; you can read it here.
2.7.5 Why is my window getting scratched from rolling it up & down?
The window's belt stabilizer has deteriorated & must be replaced. Chrysler issued a TSB covering this issue; you can read it here.
| 1st Generation Neons FAQ |
| neons.org |